Monday, June 29, 2009

Morning Glory Muffins . . . Feel Free to Customize Them . . . Gloriously!


I started out this evening thinking I'd just make some run o' the mill banana bread or banana muffins. I had two ultra ripe bananas to use up. We've frequently got a couple of senior-citizen bananas laying around here, offering themselves up for just such a purpose. But as I started assembling ingredients for a recipe I'd used a hundred times before, something came over me. It was the irrepressible urge to customize a recipe to my heart's content. So, I didn't end up with banana anything. Though those overripe bananas did make their way into my muffins, they are now sharing the spotlight with a host of deliciously chewy items.

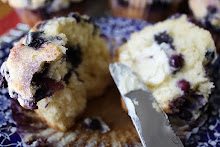
My original, rather dull muffin vision had morphed into technicolor Morning Glory muffins (with a capital MG!). Have you ever made them? One of the best things about them--and there are many good things about them--are their versatility. You can customize them to the extreme, as long as you keep in mind a few basic tenets common to most simple quick breads.

Allow yourself all sorts of freedom as far as your add-ins, which can be any kind of nuts you like, raisins, carrots, coconut, just about any dried fruit that interests you, you name it. I'd say it's fine to add in chocolate chips, but then we'd be on the slippery slope towards a cakey/desserty muffin and we're just not on that particular trajectory at the moment, so let's not talk about chocolate chips in this post, okay? (We can always talk about chocolate again in the next post if we want to, so let's stay calm . . . let's not panic!!) Remember to keep in mind how much fluid you're putting into your recipe in relation to the dry ingredients. Batter that's too soupy is . . . well. . . too soupy. Too thick and pasty? That's not good either.

I'd avoid fiddling with the dry leaveners (baking powder and soda) unless you're prepared to possibly have a flop on your hands. You might luck out, but why risk it? You can choose to use one egg or two (I like to use two for these); they act as leaveners too, you know. Other than that, you can make all sorts of substitutions. Vegetable oil can be substituted for melted butter. Whole wheat flour, white whole wheat flour, oats, or bran can be substituted for a portion of any white flour in your recipe. Spices are up for grabs as well. Like nutmeg? Add a little bit in. Hate cinnamon? Leave it out. Interested in what things might taste like with allspice? Put a pinch in, it can't hurt. Have a soft spot for dried or candied ginger? Go for it.

Buttermilk or yogurt can frequently be successfully used instead of milk. And, God knows, something rich like heavy cream could be used besides milk, but despite its deliciousness it might negate the more healthful qualities inherent in Morning Glory muffins, and make them sit a little too heavily on your early morning stomach! These babies aren't called Morning Glories for nothing, you know. They really are a nice breakfast treat. A muffin, some fresh fruit, a cup of tea or coffee. Sounds good, doesn't it?

This recipe is my own wild and crazy version of MG muffins. They're not dense and rubbery at all. They're rather light, and very tender when they're fresh and still warm. Not too much chewy stuff inhabits them. Just enough chewy stuff to make them nicely satisfying. You don't need a mixer for these. They're fast and easy. Good warm, good cold. Good with butter, good without.

They're just plain good. And that's that. So ponder your options and go make a batch!

Morning Glory Muffins (Any Way You Want Them)

Makes 18 muffins.
Preheat oven to 350 degrees. Line your pans with cupcake liners, or use baking spray.

1/2 cup whole wheat flour
1 cup unbleached All Purpose flour
1/2 cup quick or old fashioned oats
1 and 1/2 tsp. baking powder
1/2 tsp. baking soda
1/2 tsp. salt
1/4 tsp. cinnamon
1 pinch ground ginger
1 pinch allspice

2 large eggs
2 large very ripe bananas, mashed
1/2 cup vegetable oil (I use canola)
1/2 cup milk
1 cup granulated sugar

1/2 cup shredded peeled carrots
1/2 cup coarsely chopped pecans
1/2 cup shredded sweetened coconut
1/3 to 1/2 cup raisins

In a large bowl, mix together the oil, milk, eggs, and sugar until well combined. Stir in the mashed banana.


Into a medium bowl, measure out and combine the flours, oats, spices, salt, baking powder, and baking soda. Mix together well with a fork or whisk.


Add the above dry ingredients all at once to the liquid mixture. Stir just to combine.


Add in the carrots, pecans, coconut, and raisins, folding into the batter until just combined.


Portion the batter evenly into your pans. (I use a no. 24 ice cream scoop to do this. It holds almost 3 tablespoons and is just the right size.) I like to sprinkle sanding sugar, or regular sugar's fine too, on the top of them before they go into the oven.


Bake on the middle shelf of your oven for approximately 20 minutes, until they're golden brown and a toothpick inserted in the center comes out clean.

Let them cool in their pans, on a rack, for about ten minutes, then take them out of their pans and let them finish cooling on the rack, or serve them warm.

Put one on a napkin, get your coffee or tea, and take your breakfast into your backyard or out onto your porch. While you're out there, see if any real morning glories, like the little one below, are about to bloom.


(If you'd like to comment on this post or read any existing comments, click on the purple COMMENTS just below!)

Saturday, June 27, 2009

Coconut Cake with Fresh Strawberries and Whipped Cream. . . Perfect Summer Dessert for a Special Occasion


I'd been pondering making a coconut cake of some sort for quite a while. Not necessarily the kind that's big and snowy white, blanketed with icing and lots of shredded sweetened coconut--though heaven knows I like that kind of cake and so, he tells me, does my husband. I will undoubtedly make that giant, furry-looking layer cake someday, but the recipe below is for a coconut cake of a different color, you might say.

Considerably different and, I must add, extremely delicious. The combination of the delicately sweet, subtly flavored, velvety cake with the fresh ripe strawberries is just absolutely perfect. Covered in sweetened whipped cream, with sliced almonds on the sides, you can't go wrong. If you're looking for something a little fancier than the usual strawberry shortcake but less sugary and heavy than a big, fat, fuzzy, traditional coconut cake, this recipe is worth your time.
This cake does not include any shredded coconut at all, so you avoid that chewy aspect that some people don't care for. The rich authentic flavor comes from coconut milk, augmented by a very small amount of coconut "extract." And where, pray tell, does one find coconut "extract"? Uh . . . it seems one doesn't, because it more or less doesn't exist. What does exist is imitation coconut extract/flavoring, and/or flavored coconut oil, and sometimes you may find something called "coconut natural flavor blend," (though based on that stuff's ingredient list it doesn't sound very natural to me). Why is this true? Why no real coconut extract? Beats me. Maybe it has something to do with perishability? Mmm . . . I don't know. We do know that coconut milk is highly perishable, which pretty much explains why we only see it for sale in cans. (You can, of course, start hacking open your own fresh coconuts if you're a hardcore do-it-yourselfer, but I don't think I've ever met a single human, living or dead, who looks like they could competently penetrate a coconut. So that's out.) While typically I would not want to use an imitation extract for any baked good I make, in this case there seems no reasonable alternative, and the fake stuff appears to taste fine. One must make do . . . mustn't one?

The original recipe, from which my version derives, came from the California Strawberry Commission website. They call their version, "Coconut Strawberry Cake." (I happened upon it one day while searching under the term "strawberry cake." I didn't really want to make a garden variety strawberry cake, though, because every recipe I've found for that yields a ferociously pink cake! I didn't want a pink cake. Haven't wanted one in probably forty years. Though I confess that pink is still my favorite color.) My changes to the recipe included: using only one layer for my cake (one layer split in two) versus their use of two full layers; using regular versus lite coconut milk; not using their cooked icing recipe at all; and not putting coconut on the sides of the cake. And, finally, I revised the instructions somewhat, without leaving out anything important.

The recipe you see below still yields two full 8" layers, but I wrapped and froze the extra layer to use another time; you'll only need to use one layer to assemble one cake, as I prepared it. That is, of course, unless you want a big, tall, bonafide two-layer cake. My advice, though, is that the use of one layer, split in half, is just right. Especially "just right" if you use full fat coconut milk; the added richness in that milk, in combo with two big cake layers, would put this dessert over the top as far as richness goes.


Coconut Cake with Fresh Strawberries

Preheat oven to 350 degrees. Spray two 8" cake pans with baking spray, or grease them. Cut out two 8" circles from parchment paper; fit them into the pans. Spray/grease the paper as well and then dust the pans with All Purpose flour.

For the cake:

2 cups sifted cake flour
2 tsp. baking powder
1/2 tsp. salt
3/4 cup (1 and 1/2 sticks) unsalted butter, softened
1 and 1/2 cups granulated sugar
3 large eggs, separated
1 cup coconut milk (canned type)
1/2 tsp. coconut extract (imitation's okay!)

In a medium bowl, sift together the cake flour, baking powder, and salt. Set aside.

In a large mixer bowl, with paddle attachment, beat the butter at medium speed until light colored and soft.

Slowly pour the sugar in with the butter, at medium speed, and mix for about 5 minutes, until light and fluffy.

Add in the egg yolks one at a time, beating after each addition until mixed.

At low speed, alternately add the flour and coconut milk; three additions of flour and two additions of coconut milk, beginning and ending with the flour.

Add in the coconut extract at low speed until well combined.

In a small, clean mixer bowl, using the whisk attachment at high speed, beat the three egg whites until they form soft peaks. Gently fold about one third of the whites into the cake batter, then fold in the remainder, being careful not to overmix and deflate the whites.

Divide the batter between the two cake pans and smooth the tops. Place the pans on the middle shelf of your oven. Bake for approximately 25 minutes, until golden brown and a toothpick inserted in the center comes out clean. Cool the cakes on a rack for five minutes, then turn the cakes out carefully onto the racks to finish cooling completely. When they're cooled, wrap one and set it aside/freeze it; you won't need it to assemble this cake.

Put the cake layer that you're using on an 8" cardboard cake circle, if at all possible. (It's by far the easiest way to pick up and move a cake like this; you can buy them at Michael's or JoAnn's in the cake decorating aisle--invest in some!) Using a sharp bread knife, carefully slice horizontally through the middle of the remaining cake layer. Separate the top layer and set it aside.


For the strawberry filling and top-of-the-cake garnish:

2 lbs. of medium to medium-large strawberries, fully ripe
1/2 cup good strawberry preserves with all the large fruit chunks removed (you need it to be easily spreadable)

Rinse, and completely remove the stems from, the strawberries. Dry them on a paper towel. Separate out the prettiest and most uniformly sized/shaped berries for use on the top of your cake. You'll probably need at least 20 nice berries for the top; set them aside. With the remaining berries, slice them vertically, about 1/4 inch thick. Have ready at least one cup sliced, more or less; set them aside until you're ready to assemble the cake.


For the sweetened whipped cream (aka Chantilly cream or, if you prefer to say it the French way, Creme Chantilly!):


1 1/4 cup heavy whipping cream
1/3 cup sifted confectioners' sugar
1/2 tsp. vanilla extract

Beat the cream on high speed until soft peaks start to form. Add in the confectioner's sugar and the extract. Continue beating until medium-firm peaks form. Put the finished whipped cream in the fridge, covered, until everything you need to assemble the cake is ready.


To assemble the cake:


Take the cake layer that's still sitting on the cardboard cake circle, and spread it evenly with half of the strawberry preserves.

On top of that, spread out the strawberry slices, overlapping a bit, in concentric circles. It doesn't need to look perfectly uniform, it just needs to be about the same thickness all over.

Take the other layer and spread it evenly on one side with the remaining preserves. Now, as carefully as possible (because this cake is soft and floppy), gently lay it jam-side-down onto the sliced strawberries. Best to flip it on there quickly, like you'd flip over a cooking pancake.

Now cover the cake with the whipped cream. Put a big scoop of it on the top of the cake, and spread it evenly and thickly (with an offset spatula, if you've got one). Smooth it all over the top and sides, but don't worry about making it real smooth. It will be mostly covered up.


For the garnish on the sides and top of the cake:


3/4 cup sliced almonds, untoasted (or, if you prefer, you can use toasted coconut instead)

To apply the sliced almonds, hold the bottom of the cake with your left hand (see why it's good to have it sitting on a cake board?), over something like a baking sheet with sides to catch the falling almonds. Grabbing a handful of the almonds in your right hand, gently press them into the sides of the cake as you turn it with your left hand. Do this until the sides seem sufficiently covered all around. Try not to let the almonds get onto the top of the cake.


Now, arrange your strawberries as you prefer on the top of the cake, pressing them just lightly, tips pointing up, into the whipped cream.

If you can manage to work it out that the cake is served within a few hours of being assembled, without it having to be refrigerated for very long at all, that would be best. The cake part itself is beautifully soft and nice at room temperature, and it contrasts pleasingly with the cold berries and whipped cream. Do whatever you need to do, though, as far as keeping it cool/cold. In any case, just don't let the whipped cream get warm.

Voila! Put your cake on a cute serving plate and you're good to go!


(If you'd like to comment on this post, or read any existing comments, please click on the purple COMMENTS below!)

Friday, June 26, 2009

Baking & Gardening . . . What More Does One Need?

Call this installment No. 2 of my desire to share a few new photos of flowers and plants, from my backyard, with you. It won't take long. Bear with me. Gotta get this out of my system before I can do another baking post.

Just to reiterate: People who love to bake and/or cook seem to really like gardening, or just really like plants--have you ever noticed this? Anyway, my completely informal and non-intrusive survey indicates it must be true. Yes, that's the non-scientific and highly subjective conclusion I've come to over the years.

(If you'll indulge me while I go off on a bit of a tangent for a moment: Even my recent culinary arts teacher, whom everyone reverently refers to as "Chef Sue," revealed to the class yesterday that she's a master gardener, in addition to her many other talents. She told us that when neighbors, who of course know that she's a professional chef and a culinary instructor, bring her gifts of gigantic overgrown zucchinis, as neighbors have a tendency to do, she just smiles sweetly, thanks them profusely, and has to squelch the urge to immediately throw the giant zukes away right after they leave. She knows an old, seedy, freakish-sized vegetable when she sees one. And being a chef, well, she won't touch a ten-foot zucchini with a ten-foot pole. Now, I'm not currently growing any veggies in my own yard--too little sunshine, too much compacted clay soil-- so that little story may seem barely germane, I know . . . but when she told us, she actually mimed chucking the offending zucchinis over her shoulder and it was a rather funny moment, as she's a rather sober and somewhat elderly teacher. Maybe people just can't resist sharing their wacky gardening-related stories.)

Now then, returning to our backyard . . . let's start with sweet peas . . .

I just love their odd irregular shape and curling tendrils. There's something appealing to me about the way they grow . . . recklessly, and in wonderful tangles.


Below is a tightly closed morning glory bud. My mom-in-law, Nancy, gave me some little plants just a couple of weeks ago. She can grow anything.


The pink roses, below, grow on a scrappy little bush behind our garage. They're pretty neglected, but that doesn't seem to stop them.

I should go outside right now to see if the lily, below, bloomed today. It looked full to bursting last night after the rain, didn't it?
In the photo below is wild ginger (no relation to the stuff that's edible, far as I can tell) that grows in a very shady area in the back of our yard. My mom-in-law, who I mentioned above and who I am proud to say is also a master gardener (what a cool thing to be), gave me a few little cuttings perhaps ten years ago and they've developed into a couple of beautiful clumps. The leaves, which are the attractive part of the plant, reflect the light in a unique way; they have a shiny velvety quality that's evident especially when they're dry. And they're such a clear green. There's something restorative in just looking at them.

Okay, that's all. Thanks for being patient.

Maybe I'll go bake something now . . .


(If you would like to comment on this post or read any existing comments, please click on the purple word COMMENTS just below!)

Sunday, June 21, 2009

Sour Cream Zucchini Bread . . . When There's Life Left in Your Zucchini . . .

I found a small zucchini languishing in my vegetable drawer yesterday. It was just on the precipice of being overly ripe. I'll bet you have one like it languishing somewhere in your kitchen too. (Come on, I know you do. Go back and check that refrigerator again. Look in the back, on the bottom shelf. See it? It's been camouflaged by that pickle jar.)

Not sure whether to use it up or throw it away? Assuming it's still perfectly viable, don't throw it out! Make yourself a nice loaf of sour cream zucchini bread. If you want to, you can jazz the loaf up with chocolate chips, or chopped nuts, maybe some raisins. Or heck, nothing wrong with leaving it plain. (You know, like Thoreau said: "Simplify, simplify." He really did say that, didn't he?)

This is a really easy recipe that can be thrown together in a hurry. It can all be done in two bowls, with no mixer required, just a spoon. It's a good, moist quick bread that makes a satisfying snack, breakfast treat, or light dessert. Tastes even better the second day (don't you just love it when your baked goods do that?).


Sour Cream Zucchini Bread, with Chocolate Chips (or not . . .)

Makes one loaf.

Preheat oven to 350 degrees.

1 1/2 cups of AP flour (bleached or unbleached)
1 cup granulated sugar
1/4 tsp. cinnamon
1/8 tsp. baking powder
1/2 tsp. baking soda
1/2 tsp. salt

2 large eggs, lightly beaten
1/2 cup sour cream
1/3 cup vegetable oil
1 tsp. vanilla extract
1 cup grated zucchini

3/4 cup of chocolate chips of your choice (I lean toward semisweet for this kind of thing)


Grease one 9 x 5 x 3 loaf pan (or use baking spray).

In a large bowl, thoroughly combine all the dry ingredients, except the chocolate chips.

In a medium bowl, mix together the beaten eggs, sour cream, oil, and vanilla.

Add the grated zucchini to the liquid mixture and stir well to combine.

Pour the liquid zucchini mixture all at once into the flour mixture and stir just to combine. (Don't overmix or you'll end up with bubbly tunnels in a loaf that's not tender. No fun.)

Add in the chocolate chips, stirring to lightly combine.


Pour the batter into your greased loaf pan. Put the pan on the middle rack of your preheated oven. Bake for about 45 minutes, or until the loaf is quite golden brown and a toothpick inserted in the top comes out clean. Cover the top of the loaf lightly with foil if the top is overbrowning at any point.

Let the baked loaf cool in the pan for about ten minutes, then turn it out and let it finish cooling on a rack.

Yummy if you slice it while it's warm, but the flavors really mingle and start to come out when the loaf has had a chance to rest and cool completely. And, like I mentioned above, this tastes really good, and the texture sorts of sets, by the next day. Kind of improves with age, I guess. Just like us.


*This is a recipe that I adapted from a version I found on a website called "Taste of Twinsburg." I made a number of changes, including halving the recipe. Then, I decreased the amount of oil, increased the sour cream, decreased the cinnamon, removed the nuts/raisins and replaced them with chocolate chips, and I completely revised the directions.


(If you'd like to comment on this post or view any existing comments, please click on the purple COMMENTS word just below!)