When I first decided to make challah, I thought of it simply as a beautifully braided, golden loaf of bread. To me, it was a baking challenge that I wanted to conquer--just one among many other such baking challenges. Of course, not being Jewish (yeah, I confess--I'm Presbyterian), and knowing almost nothing about the mystery and symbolism of this very special bread, I approached it as I tend to approach all recipes. That is, like a little research project. First, I hunt for and examine quite a variety of formulas. Then I narrow it down to what I feel are the best choices, based on certain general criteria and, finally, I select the recipe that I'll actually use. From there I pick the day I'll do the baking, and make sure I have all the needed supplies.
 What I don't typically do, however, is give a great deal of thought to the history and cultural weight that may accompany whatever it is I'm planning to prepare. Challah, though, gave me food for thought--no pun intended. You see, my older son, Charlie, happened to comment to a close friend of his, who happens to be Jewish, that I might try making challah. Interestingly, according to Charlie, this fellow--who probably knows that I bake all the time--responded with mystification and essentially remarked, "Why would she want to do that?" That's pretty much all I know about his response, but it set me thinking--thinking and wondering.
 So I did a bit of extra research, because I wanted to know just what I was dealing with, and I'm glad I did. I think I understand, now, the origin of and the sentiment behind the question posed by my son's friend. I understand that this bread's history is deep, rich, and laden with symbolism. For an awful lot of people, it's not just something to eat. Not just another egg-bread recipe. It's an important part of a complete way of life. I understand that.
 This is special bread, and I loved making it.
About the recipe . . .
In scouting out a recipe, there were zillions of possibilities to choose from, but in the end I figured I'd better pick something rock-solid reliable, so I opted for the challah in the 2009 book, Peter Reinhart's Artisan Breads Every Day. I don't believe that this is the kind of cookbook that lets people down; I recommend it.
 I chose to use honey in these loaves, versus sugar or agave nectar, and I slightly reduced the amount of vanilla in the recipe. (I think this was, in fact, the only challah recipe I saw that includes so much vanilla, let alone any vanilla at all.) The recipe also calls for no fewer than 8 to 10 egg yolks. That's a lot of eggs, but they're a big part of what characterizes this bread to begin with so they're well worth it, and they lend a lovely color to both the exterior and interior.
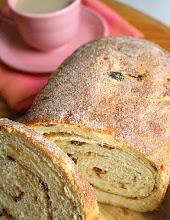
 This challah smells glorious while it's baking, and I loved how shiny and burnished the crust looked when it came out of the oven. I kept going back into the kitchen to gaze at it as it cooled on the counter. For a first-timer with challah, I think these loaves turned out pretty well.
 I reworded the instructions here and there for brevity, and within them I focused on making this with a mixer. Also, I adjusted the ingredient list to reflect the specific preferences that I chose, in cases where Reinhart offered ingredient choices. Please note, this is a recipe that requires the dough be made one day, and chilled at least overnight. The slow rise during the long chilling period brings out the best flavor.
This stuff makes fantastic toast. Fantastic.
 Challah
This makes 2 large loaves.
(For a printable version of this recipe, click here!)
2 and 1/4 cups of lukewarm water (about 95 degrees)
1 and 1/2 Tbsp. instant yeast
8 to 10 egg yolks (6 oz. total)
5 Tbsp. vegetable oil (I used canola)
4 and 1/2 Tbsp. honey (I used clover honey)
2 tsp. vanilla extract
7 and 1/2 cups unbleached bread flour (I used King Arthur)
4 tsp. coarse kosher salt
1 whole egg, mixed with 2 Tbsp. water, for egg wash
Combine the water and yeast in a mixing bowl and stir with a whisk to dissolve. Into this, add the yolks, oil, honey, and vanilla. Whisk lightly to break up the yolks, then add in the flour and salt. Using your mixer, with the paddle attachment, mix on the lowest speed for 2 minutes. The dough will be coarse and, per Reinhart, "shaggy" (Mine didn't look shaggy exactly, but it did look sort of rough.) Rest the dough for 5 minutes in the bowl.
Remove the paddle attachment and put the dough hook on your mixer. Mix on medium-low speed (my mixer will only do bread dough on low speed!) for 4 minutes.
 Using a bowl scraper, plop the dough onto a lightly floured work surface, then dust the top of the dough with flour.
 Lightly knead the dough with your hands for 1 to 2 minutes, adding flour as needed to keep it from sticking. The dough should be soft, supple, and tacky but not sticky (mine felt exactly like this, lo and behold!).

Form the dough into a ball, put it into a clean lightly-oiled bowl, and cover the bowl with plastic wrap.
 Immediately refrigerate the dough, overnight, or for up to 4 days. (I just did the overnight thing.) It will double in size in the fridge. (Mine doubled alright, and was pressing against the top of the plastic when I went to take it out the next day.)
On the day you're ready to bake the bread:
Take the dough out of the fridge about 2 hours before you plan to bake.
Line two baking sheets with parchment paper.
Gently dump the dough out on a lightly floured work surface and, using a bench scraper or a sharp knife, cut it into however many pieces you will need. If you're making two simple 3-strand braided loaves, cut the dough into 2 big chunks, then cut each of those big chunks into 3 small equal-sized chunks.
 Roll each piece into a cigar or torpedo shape. After doing this with each piece, go back to the first piece and roll it out further into a long rope that's 10" to 14" long. Do this with all of the pieces, and try to make them even in length.
To braid each loaf :
(There seem to be a few philosophies on how to do this; the method below is just the way I chose to do it--simple as can be, no fuss, no muss. There are countless examples available online that can show you how to do this a variety of ways, if you're interested.)
Lay three strands of dough side by side and pinch the dough strands together at the top. Braid the strands just as you would braid someone's hair, starting at the top and going down. Braid snugly but without stretching the strands too much. Pinch the ends together at the other end of the loaf and tuck the pinched edge under the loaf. Transfer each braided loaf to one of the parchment-lined baking sheets.
The photo just below is a simple 3-strand braid. The one below that, is a simple 3-strand braid that's been topped by a smaller 3-strand braid! Do it however you like!

 Brush the entire surface of each loaf with the egg wash.
 Let the egg-washed loaves rise at room temperature for about an hour; they will not rise very much. About halfway through the rising time, when the first coat of egg wash has mostly dried, gently brush on a second coat, being careful not to press on the dough. If you like, you can sprinkle on poppy or sesame seeds at this point (I left my plain, as you can see).
 About 15 minutes before baking, preheat your oven to 350 degrees. Bake for 20 minutes, then rotate the pans. If the loaves are getting too dark too quickly, lightly lay a sheet of foil over them. Bake for another 15 minutes or so. (Mine were done quickly, since my oven can be unpredictably hot; Reinhart suggests leaving the bread in for up to 30 minutes, but if I'd done that mine would have been quite burned.) When they're done, the loaves will sound hollow when thumped and they will have reached an internal temperature of 190 degrees. (I used the thermometer to make sure mine were done; rich breads like this can look like they're done on the outside way before they're done on the inside.)
 Cool the loaves on wire racks for about an hour before slicing.
 (If you'd like to comment on this post, or to read any existing comments, just click on the purple COMMENTS below!)