Saturday, March 26, 2011

Winner of HSN Gift Certificate & Sweet Melissa Baking Book Giveaway!


Just wanted to announce the winner of Jane's Sweets & Baking Journal's very first giveaway. The lucky recipient of the HSN gift certificate and a copy of The Sweet Melissa Baking Book is commenter Elizabeth Simpson! Congrats, Elizabeth! Please email janessweets@gmail.com and provide me with your contact info so I can mail you your prizes. And thanks, everybody, for all of your comments!

Friday, March 25, 2011

In Praise of Muffins and Ukuleles . . . (Brown Sugar Buttermilk Muffins with Marcona Almonds, Dried Sweet Cherries, and Apricots)


My younger son, Nathan, has a ukulele. He procured it with his own money just after Christmas, and he's been teaching himself to play. The instrument's maker is a company called Lanikai, and their slogan is, "Lanikai . . . Makes Me Happy!" (Click that if you want to hear their perky little ditty.) That motto sums up how I feel about homemade muffins--they make me happy. From their simplicity to their diminutive size, I like them. They're so approachable, and unpretentious in the extreme. In the same way that anyone can learn to play the ukulele, anyone can produce a fine muffin.


I'm developing a similar fondness for that ukulele. It's not loud or showy, and I'll bet it weighs in at a whopping 12 ounces, if that. It's subdued tinkling reminds me of wind chimes. Maybe my affection stems, in part, from the fact that my kid seems so enamored with it. He'll pick it up in a quiet room and gently pluck away, quite unselfconsciously, in a manner that's not typical for him. The ukulele's peaceful appeal is completely unlike that of any electronic device that competes for his teenage attention. I find it reassuring that Nathan appreciates that. Lanikai picked a very appropriate slogan, it seems to me, and I can just imagine how happy I'd be if I nibbled a nice muffin while listening to Nathan pluck away on that thing. Pretty darn happy, probably.    :)


About this recipe . . . 

This recipe adaptation brings together ingredients I am perennially crazy about--brown sugar, buttermilk, Marcona almonds (softer and sweeter than regular almonds), dried cherries, and plump, dried apricots. It's an adaptation, I suppose, of several muffin recipes that have wandered into my life over the past year or two, but I think it harkens back most directly to this recipe that I adapted from a Peter Reinhart muffin last summer.


This new muffin's differences include a focus on almonds (including the nuts themselves, along with almond extract, and a small amount of almond meal in place of some of the flour); the addition of sweet, dried, Michigan cherries, and dried apricots; and, some whole wheat flour standing in for a portion of the white flour. These bake up nicely and, when broken open, reveal a tender crumb that's soft without being cakey. The moisture from the buttermilk and brown sugar really give these a longevity that most muffins can't boast. Not too bland, nor too sweet, they're just right. I love them.


Brown Sugar Buttermilk Muffins with Marcona Almonds, Dried Cherries, and Dried Apricots

(For a printable version of this recipe, click here!)

Yield: 18 regular size muffins (or, at least 9 jumbos or 36 minis)

Preheat oven to 375 degrees.

Use baking spray liberally on 18 regular size muffin cups, or use paper liners. (Actually, if I were you, I'd use some baking spray even if I were using liners at the same time. Overkill? Maybe. But why take the chance? I spray the stuff on the top of the pan too, before filling the cups with batter, so any overflowing batter doesn't have a chance to glue the muffins to the pan's surface. Let's just say I've learned my muffin lesson in the past.)

2 and 1/2 cups all-purpose flour, unbleached
1/2 whole wheat flour
1/2 almond meal (This means finely ground almonds. I buy this stuff, inexpensively, at Trader Joe's or make it myself in the food processor from whole or blanched almonds. Just don't over grind the almonds accidentally into paste!)
1 cup light brown sugar
1/2 cup dark brown sugar
1 and 1/2 tsp. baking powder
1/2 tsp. baking soda
1 tsp. salt (I used coarse kosher salt; if you use regular salt, you might want to decrease this measurement slightly.) 
1 small pinch of ground nutmeg (I like to use fresh and grate it myself. Much nicer smell and fuller flavor. I buy whole nutmeg from Penzey's, and I use a tiny little hand-grater that I found at Bed Bath and Beyond.)

1 and 1/4 cup buttermilk (I'd suggest you keep a couple of extra tablespoons on hand to mix in just case the batter seems unusually thick to you.)
2/3 cup canola oil
2 eggs, large
1 and 1/2 tsp. vanilla extract
1/2 tsp. almond extract 

1/2 to 3/4 cup dried cherries, roughly chopped 
1/2 cup Marcona almonds, roughly chopped (I buy these at Trader Joe's, too. They come in small plastic containers, salted and roasted, and packed in a small amount of oil. They're extremely tasty, but not cheap.)
1/4 moist, plump, dried apricots, roughly chopped (The softer and moister the better. Super leathery apricots are not so good in a muffin.)


In a large bowl, evenly combine all of the nine dry ingredients (not including the fruit and nuts) with a whisk. 

In a small bowl, mix together all of the chopped fruits and nuts. Remove about 1/4 cup of this mixture and set it aside; you'll use this to sprinkle on the top of the unbaked muffins. 


In a medium size bowl, whisk the eggs lightly, then add in the buttermilk, oil, and extracts. Whisk until well combined.


Make a well in the center of the dry ingredients and pour all of the liquid into it. Stir just until no big streaks of dry ingredients are evident. Use care not to over mix. 


Sprinkle in the fruit and nuts and stir gently just to distribute them fairly evenly. 


Using a portion scoop, if possible, put the batter into the muffin cups. My regular size cups were pretty full, as the photos show. Sprinkle a pinch of the fruit and nut mix that you set aside onto the top of each one. 


Bake the muffins in the center of the oven for about 15 -20 minutes, or until nicely golden and a toothpick inserted in the center comes out clean. (If you tend to have trouble with your muffin bottoms burning, set the muffin pan on top of a cookie sheet when you put it in the oven.) Let the muffins cool in their pan, on a rack, for no more than a few minutes, then carefully remove them from the pan to cool the rest of the way on the rack. 

(If you'd like to comment on this post, or to read any existing comments, please click on the purple COMMENTS below!)

Tuesday, March 22, 2011

Jane's Sweets & Baking Journal's First Giveaway! (HSN Gift Certificate, and The Sweet Melissa Baking Book)


This, fellow bakers, is the very first time I've ever done a giveaway, and I've been blogging now for almost two years. I long resisted climbing onto the giveaway bandwagon, despite having been approached to do this kind of thing a few times in the past. Maybe I'm mellowing, though, because when I received an offer a few days ago from HSN, the online and TV mega-retailer, to give away a small gift certificate ($10), I thought it might be fun to finally join the crowd. And let's face it--a smart girl doesn't turn down a gift certificate of any denomination.


Why, you may wonder, did HSN see fit to contact a baking blogger? Here's the scoop: On March 26th and 27th, they're featuring a special "Cooks Spring Weekend Event" that's being presented by none other than Bon Appetit. Involved are the likes of Wolfgang Puck, Jacques Torres, and Emeril Lagasse, along with several other stellar names from the culinary galaxy. Looks like it'll be an enjoyable diversion, assuming you actually turn off your mixer and turn on your TV or computer (ha!). The gift certificate is good until the end of April and, who knows, maybe it will help you purchase that Wolfgang Puck creme brulee torch you've been yearning for, or that fabulous baking pan that looks like a sports stadium. (I'm waiting for Nordicware to make a pan shaped like Chartres Cathedral. I think it's only a matter of time. They're probably still perfecting the flying buttresses.) Hey, every dollar helps.


On top of that, I want to give away a copy of The Sweet Melissa Baking Book. Somehow, I came to own two copies of this (who knows how these things happen?) and one of them I have never used. It's like newer than new--no stains, no crumbs, no scribbles, no nothin'--and it wants to go live with someone else. So, you can page through the book while you're considering how to spend your gift certificate! No down side to this deal.

To toss your name into the hat, just leave a comment on this post before Saturday, March 26th, and within a day or two after that I will announce the winner, who can then email me with their contact info so I can send them their loot. Tres facile! (That's French for, "very easy!")

*  *  *  *  *  *  *  *

(If you'd like to comment on this post, or to read any existing comments, just click on the purple COMMENTS below!) 

Sunday, March 20, 2011

Chocolate Cinnamon Pastry Twirls . . . (When the End Justifies the Mess!)


Perhaps you're familiar with Julia Child's statement about messiness? Essentially, she said that you'll never learn to be a good cook if you're constantly worried about making a mess. I believe that's sound advice, at least as it pertains to one's very own kitchen.


It's advice that helps to free me from distraction while in the midst of assembling a new recipe. That's when I tend to be at my messiest--while making something completely new, alone in the kitchen. As a case in point, I present these marvelous chocolate-cinnamon pastries.  My kitchen wasn't fit for man nor beast while I was preparing them, but that didn't bother me. Hell bent for pastry, I just forged ahead.


I really wasn't sure what to call these. The original recipe, which comes to us from Marcy Goldman's book A Passion for Baking, labels them "chewy chocolate sticks" but I felt that was inadequate to describe their lusciousness. After all, that could refer to something as mundane as a Tootsie Roll and this, my friends, is distinctly not a Tootsie Roll.

Made from an unusually soft, and gently sweet, yeast dough, this was a formula that I tweaked a bit to suit my taste. The original recipe called for raisins along with an equal proportion of chocolate chips; I omitted the raisins completely, and increased the chocolate chips by about 50 percent. I also added in almost 75 percent more cinnamon than called for, and at least 25 percent more cocoa powder. I used SAF Gold Instant yeast, which is specially formulated for richer doughs. Additionally, I decided to whisk the grated zest of one large orange into the sugary filling.


And, only out of necessity, I used more flour than the ingredients list indicated--about 25 percent more, in fact. My dough, when first mixed, was not a dough at all--it was batter. I knew it was not going to evolve into dough, and it could not possibly have risen into anything that could have been rolled out or cut into any sort of shape. So, I kept adding in more flour, very gradually, until I felt the dough had enough body to fulfill its yeasty destiny. The baked interior texture of the pastries was pretty fantastic, all in all--soft and supple, without being even slightly dense, gummy, or dry--so I'm glad I followed my instincts.

I ended up with well over half a cup of the filling mixture leftover, which I poured into a plastic baggie and saved. There just seemed to be a ton of the stuff. But I'm not complaining. I'll find a use for it. You know I will.


Chocolate Cinnamon Pastry Twirls

Yield: 12 good-sized twirls

(For a printable version of this recipe, click here!)

For the dough:
1 and 1/4 cups warm water
2 tsp. instant yeast (The original recipe calls for 1 Tbsp. of rapid rise yeast; if you use that, dissolve the yeast in the water first. Instant yeast does not require that step.)
2 large eggs (at room temperature)
3/4 cup granulated sugar
1 tsp. salt
1/2 cup unsalted butter, very soft
2 tsp. vanilla extract
1/3 cup dry milk powder
2 and 1/2 cups all-purpose flour, plus more for your work surface when it comes time for rolling
2 and 3/4 cups bread flour

For the filling:
1 cup granulated sugar
5 Tbsp. cocoa powder (I used Penzey's brand Dutch process cocoa--very good.)
1 and 1/4 tsp. ground cinnamon (Use your best cinnamon--not the cheap stuff!)
1/4 cup unsalted butter, softened and cut into small chunks
1 and 1/2 cups mini semi-sweet chocolate chips (I used Nestle.)
Grated zest of one large orange


Also:

1 large egg white, whisked
Leftover filling from above, to sprinkle atop the egg white that you'll have brushed onto the unbaked pastries


Line two (or three, if you have that many) baking sheets with parchment paper.

In the large bowl of your mixer, using just a hand whisk, mix together the water, yeast, eggs, sugar, salt, butter, vanilla, milk powder, and most of the flours. Blend well. Put the dough hook on your mixer, put the bowl on as well, and knead the dough on the lowest speed for about 8 to 10 minutes. Continue adding in flour until a very soft dough forms. Remember, you're not looking for the consistency of a batter, but you're also not looking for something like a solid bread dough. 


Take the bowl off the mixer and cover it with plastic wrap that's been sprayed with vegetable spray, then cover that with a light dish towel. Put the bowl in a draft-free spot. Let the dough rise until it's almost doubled; this could easily take up to an hour. 

While the dough is rising, mix together the sugar, cocoa powder, cinnamon, and orange zest. 


Prepare a work surface with sufficient flour for a very soft dough. Flour your hands as well. Dump the risen dough out onto your work surface. Deflate it gently with your palms.


Roll the dough out into a big rectangle, about 10 x 20 inches.


Sprinkle the dry filling mix all over the rectangle, almost right up to the edges.


Then drop the little chunks of butter evenly over that and sprinkle the mini-chips atop that.


Now, as carefully as you can, starting with the long side of the dough, roll the whole thing up, jelly roll style. (If your dough is as soft as mine was, it will be a very loose and flat roll, but that's okay!)


With a bench scraper or sharp unserrated knife, cut the roll into 12 pieces.


Gently lifting each piece, bring it over onto the baking sheet; stretch it a bit and then twist it. (Filling may drop out and seem to make a mess, but don't panic. Just keep working. I fit about five twists onto each sheet, but they rose and then baked together a little too closely; when I make these the next time, I'm only going to put four on each sheet.) Brush each piece with the beaten egg white, and sprinkle it with excess sugar mix.


Cover the filled sheets with plastic wrap that's been sprayed with vegetable spray. Preheat the oven to 350 degrees.


Let the twists proof (do their final rise) for 30 to 40 minutes, just until they've almost doubled in size. Bake them for about 25 to 30 minutes, until golden brown. Let the pastries cool on their baking sheets, set over cooling racks.

(If you'd like to comment on this post, or to read any existing comments, please click on the purple COMMENTS below!)

Saturday, March 12, 2011

Classic Vanilla Layer Cake with Mocha Swiss Meringue Buttercream . . . and My Favorite Swimmer


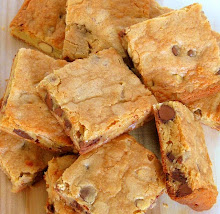
A while ago my older son Charlie asked me if I'd bake the big cake for his swim team's end-of-year banquet and I agreed. The banquet's being held early next week, so I need to get cracking. It's been a blast watching that kid swim in high school and, since he graduates this year, I will miss it. Forgive me if this sounds too cloyingly corny, but I must say it's been a remarkably gratifying and heart-warming thing for me to witness his passion, perseverance, and joy as a member of that team. Charlie's had a great experience and has grown so much. I'm proud of that guy. So proud, in fact, that I spent the entire morning on Thursday whipping up a crate full of his favorite, hefty oatmeal raisin cookies for the swim team to take with them to the state meet this weekend. There he is, below. (Check out that dimple. Go Bears!)


Anyway, now with just a few days to go, I find myself still wondering how the heck I should decorate the banquet cake. Like Hamlet, I'm plagued with indecision. Plagued, I tell you. I don't want the cake to look like I just carried it out of Costco, nor do I want it to look like it's for a bunch of eight-year old girls. Should I make little swimmers out of fondant? A pool out of piping gel? Ugh. This kind of thing always presents me with a quandary.


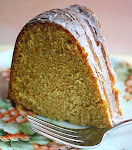
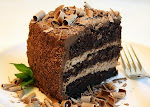
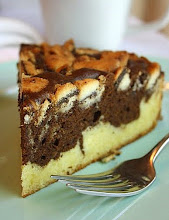
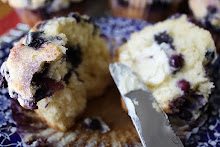
Recipe selection, on the other hand is usually much less complicated. With the team's cake in mind, I tested out this vanilla cake from Baking at Home with the Culinary Institute of America. A classic butter-based layer cake, it has warm well-rounded flavor and fine texture. It reminded me, in fact, of the sumptuous layer cakes we used to buy occasionally from Sanders stores when I was a child. Sanders was the purveyor of choice, in the Detroit area, for rich baked goods, incomparably smooth ice cream, and velvety chocolates. If you're from around here and you're at least forty years old, you probably know all about the heyday of Sanders. It's sort of still around, in name at least, though sadly only as a pale version of its former self.

But I digress. Pardon me.

About this recipe . . . 

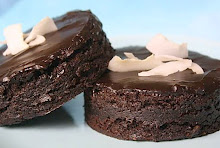
I altered the cake recipe only by upping the vanilla ante a bit, adding in the seeds from half a vanilla bean. For the icing, I used a swiss meringue buttercream that I found in an old copy of  Icing the Cake, by Jill Van Cleave, and I customized it by adding in a dash of Kahlua to turn it into a tasty mocha buttercream. A swiss meringue buttercream isn't nearly as nerve-wracking to make an as Italian meringue buttercream, and I think it's just as good. No hot sugar syrup to pour slowly between the spinning beaters and the side of the mixing bowl, thank heaven. You just whisk the sugar and egg whites over a double boiler for a while, then put the bowl onto the mixer, slowly add in the butter, then the flavorings, and beat-beat-beat until the cows come home. Eventually, it all comes together into something soft, silky, and supernaturally spreadable.

I reworded both recipes, as usual. Can't help myself.


Vanilla Layer Cake with Mocha Swiss Meringue Buttercream

(For a printable version of this recipe, click here!)

For the cake:

Preheat oven to 350 degrees. Butter or grease two 8" round pans, or use baking spray. Cut out 8" rounds out of parchment and place one in the bottom of each pan. Butter/grease the parchment.

3 and 1/2 cups cake flour
2 cups granulated sugar
1 Tbsp. baking powder (Yes, one whole tablespoon.)
1/2 tsp. salt
1 cup unsalted butter, diced into small chunks, at room temperature
1 cup milk (I used 2 percent.)
4 eggs, large
2 egg whites, from large eggs
1 and 1/2 tsp. vanilla extract
Seeds scraped from half of one vanilla bean (I used a Madagascar bean.)


Sift together, into the large bowl of your mixer, the first four ingredients. Using the whisk attachment, add in all of the butter and half of the milk. On medium speed, until smooth, mix for just about four minutes. Stop to scrape the bowl and beater as needed.

In a medium size bowl, blend together the eggs, egg whites, remaining milk, vanilla extract, and the vanilla bean seeds. In three additions, add this into the mixer bowl, beating on medium speed for no longer than two minutes for each addition. Be sure to stop and scrape as needed.

Portion the batter evenly into the two pans and bake at 350 for 35 to 40 minutes, until the cakes spring back lightly when touched.

Let the cakes cool almost completely on wire racks, in their pans. Run a thin knife or metal spatula around the sides, then carefully invert them out of the pans. 

Mocha Swiss Meringue Buttercream (Yield: 3 cups)

1 cup unsalted butter, room temperature, cut into 1/2" chunks
2 oz. good quality bittersweet chocolate, cut into very small pieces (I used Scharffenberger.)
3 large egg whites
1 cup superfine sugar
1 Tbsp. Kahlua (coffee flavored liqueur)

In a small bowl, melt the chocolate, then let it cool to almost room temperature.

Put the sugar and egg whites into the large metal bowl of your mixer. Using a hand whisk, blend the sugar and egg whites. Place the bowl over a large saucepan on the stove, containing a couple inches of simmering water. Whisk continually by hand until the mixture feel very warm, but not hot.

Place the bowl on your mixer and, using the mixer's whisk attachment, beat on medium speed until the meringue begins to form; it should look white, shiny, and form medium-soft peaks. At this point, start to add in the butter one piece at a time, continually. The icing will begin to resemble butter. Still beating on medium speed, add in the melted chocolate, and then the Kahlua. Keep beating until the mixture begins to thicken. This could take at least ten minutes, so be patient. (Some recipes for meringue-based buttercreams, in fact, have you mixing for as long as thirty-five minutes! Don't believe me? Check out some of wedding-cake diva Sylvia Weinstock's recipes!)

If the mixture starts to look curdled, don't worry, just keep mixing and it will come back together. If the mixture looks okay but seems too warm, take the bowl off the mixer and refrigerate it for about five minutes then put it back on the mixer; chances are it will thicken up quickly after that. You want it to be soft and silky, and it should be extremely easy to spread.

Use the finished icing immediately to ice your cooled cake, or cover it well and refrigerate it until you need it.


(If you'd like to comment on this post, or to read any existing comments, please click the purple COMMENTS below!)

Friday, March 4, 2011

Fantastic French Toast Starts with Homemade Buttermilk Bread . . .


Some things in life are debatable and always will be--politics, religion, how the Detroit Tigers will do in the upcoming season (anyone's guess, yet our affection for them never wanes), but one thing is certain: If you want really good French toast, you have to start with fantastic bread.


There's a lot to be said for a day-old loaf of this homemade buttermilk bread. Though it doesn't retain the just-baked enchantment that it had yesterday, its magic has evolved and matured. It's a little denser, moister, and ever so slightly sweeter than a garden-variety, home-baked white bread. I used a couple slices of it this morning to make a nice, thick PB and J sandwich for my younger son's brown-bag lunch. I'm tellin' ya, a peanut-butter and blackberry jam sandwich gives off an entirely different aura when it's made with this stuff.


And, I couldn't resist trying it out as French toast. Nothing fancy, just the classic egg and milk concoction with a tiny sprinkle of vanilla extract in there for good measure. Heat the griddle with a little butter or oil, soak the bread in the mix, and fry it up. Toss a few fresh berries on there, drizzle some maple syrup, and you've got yourself a pretty spectacular breakfast.


Remarkably simple to assemble, and fairly quick to rise, this is the kind of yeast bread to bake when you don't want to venture too far from shore, yet you crave something a little more interesting than the norm. It's a relatively forgiving recipe that you can throw together entirely by hand if you're in the mood--that's what I did yesterday. I mixed it in a big bowl using a fork, and did all the kneading by hand instead of relying on my KitchenAid's trusty dough hook. (That dough hook and I have a pretty close relationship, as you may know, but I like to give it the day off every now and again.)

This formula hails from the James Beard Award-winning book, Secrets of a Jewish Baker: Recipes for 125 Breads from Around the World, by veteran professional baker George Greenstein. The buttermilk in this recipe lends a pleasing note, along with the use of honey instead of sugar.


I adapted it by using twice as much buttermilk as called for along with a couple tablespoons of regular milk, versus using buttermilk and water. Yeah, yeah, I know, but let me explain. I did this, in part, because my flour was extremely dry and it just kept absorbing the liquid as if it were parched, and also because I wanted the essence of premium-dairy buttermilk I was using to really come through. I knew doing this was a little risky, but I was curious to see what would result. I also used instant yeast instead of active dry. And, of course, I totally reworded/revamped the directions.

I will definitely be making this bread again, and soon. Maybe you should, too!

Buttermilk Sandwich Bread (For a printable version of this recipe, click here!)

1 Tbsp. instant yeast (Or, 1 and 1/2 Tbsp. active dry yeast that's been proofed in 1/2 cup lukewarm water; adjust liquid in the recipe accordingly to compensate.)
2 cups high-quality buttermilk
1 Tbsp. and 1 tsp. honey (I used clover honey.)
2 Tbsp. unsalted butter, softened
5 to 6 cups unbleached All-Purpose flour (Start out with 5 cups, add more as needed.)
2 tsp. salt (I used coarse kosher salt.)

1/4 cup melted butter, to brush on the top of the unbaked, and just-baked, loaves.

In a large heavy bowl, mix together about 5 and 1/4 cups of  the flour, instant yeast, and salt with a whisk. Pour into that almost all of the buttermilk, all of the honey, and all of softened butter. Using a large fork, mix the dough into a workable mass, using your hands as needed to help pull it all together. If the dough seems to require more flour, add it in gradually. Likewise, if the dough is too dry to hold together, sprinkle in the rest of the butter and, if needed, a couple tablespoons of plain milk, until the desired consistency is achieved. You need the dough to be able to hold together, though it's okay if it looks somewhat shaggy.


Dump the mass of dough out onto a floured work surface and knead by hand for 8 to 10 minutes.


Stop kneading when the dough feels nicely spongy and looks smooth.


Place the dough into a large clean bowl that's been greased or sprayed with vegetable spray. Turn the dough over in the bowl so it's lightly coated. Cover the bowl with a piece of greased/sprayed plastic wrap, and cover that with a dish towel. Place the bowl in a relatively warm, draft-free spot to rise. It may take about an hour to double in size.

Grease two standard size loaf pans. 

When it's doubled, dump it out onto a very lightly floured work surface, and divide the dough equally in two with a bench scraper or a sharp knife. Working with one piece at a time, press on the dough with your palms to de-gas it (to let out the carbon dioxide). Then, gather it up into a ball and, using both hands, turn the dough while pulling gently downward on all sides to create a surface tension on the top. Cover the ball of dough with the greased plastic and let it rest for 15 minutes.


Go through the same process with the second ball of dough.

When both have rested, shape them into loaves, being careful to seal the bottom seams very securely by pinching them tightly closed. Place them in the loaf pans and cover them lightly with greased plastic wrap and the dish towel. Again, let them rise in a warm spot, undisturbed. It may take them another hour, or less, to double in size.

Preheat the oven to 375 while the dough is rising.

When the loaves are ready to bake, poke a tiny hole in the top of each in three spots with a toothpick (Greenstein recommends doing this; I've never seen another source that suggests this particular trick, but I went with it and the loaves didn't burst in the oven so I figure it did what it was supposed to do!).


Brush each loaf-top with melted butter. Use a squirt bottle to mist water into the oven before you put the bread in; give it a few good squirts quickly with the door slightly open. Place the pans in the oven and squirt the mist in again, a few times. Quickly and gently shut the door. Don't open it again for at least 15 minutes. The bread may take half an hour or more to bake. The best way to be sure it's done inside is to insert a stem thermometer into the bottom or side of the loaves;  you'll want the internal temperature to be around 200 to 210 degrees.

 
Brush the top of the baked loaves with more of the melted butter, and let the bread cool on a rack. Enjoy!


(If you'd like to comment on this post, or to read any existing comments, please click on the purple COMMENTS below!)