Thursday, May 31, 2012

The Chocolate Interview I'll Never Forget, or An Afternoon Well Spent . . . (Perfectly Velvety Dark Chocolate Brownies)

Have I ever told you about my most surreal chocolate experience? The one that seemed both incredible and incredibly strange at the same time? NO? Well, that's an oversight we must remedy, so get cozy.

It all began about three years ago. One wintery afternoon, with nothing better to do, I took an online survey on one of those market-research sites. The kind of site where they compensate you for a few minutes of your time by giving you points that eventually add up into something like a magazine subscription. Anyway, the survey was all about chocolate--how you use it, where you buy it, what brands you like, and so on.


At the end of the survey another question appeared on the screen, inquiring if I'd be willing to participate in further research on the same topic. Naturally, I clicked yes, as it would never occur to a chocolate junkie to click otherwise. One day later, I received a call from a market research company here in southeastern Michigan. A perky female voice asked me if I'd like to be a research subject in an "in-depth, face-to-face, marketing study" all about chocolate. At that point, I'm pretty sure time stood still. I looked at the phone. Was I having an auditory hallucination? A chocolate study? Were they kidding, I asked? No, this was serious, the voice replied. Count me in, I thought. Gathering my composure, I told the woman I was intrigued and she went on to explain how the study would work.


It would take no more than a couple of hours of my time and they would compensate me with a payment of  $135 dollars. So far so good, right? Then she remarked that the study would need to take place in my home. In my home? My little 1948 bungalow?? Yes, she confirmed. At that point I began to wonder if the whole thing was on the up and up. It just seemed awfully far-fetched to me that any company would actually send researchers into someone's house to sit at their kitchen table and gab about the mysteries of chocolate. Was I going to let these folks in the front door, only to be sold into slavery? Would they clobber me over the head and steal all the premium chocolate chips in my pantry? I just didn't know what to make of it.


But after hearing more, and confirming the legitimacy of the company, I agreed to do it and we set up the appointment. My house, 1pm on a weekday, and I should expect four people to show up. At some point  in the second half of the appointment, we would all drive to a local store of my choosing--a place where I might typically buy chocolate--and continue our  discussion there.

The day of the visit, I was nervous. I'd also been told they'd be filming the entire interview and that they'd ask me to show them where in my house I "like to enjoy chocolate." I tidied the joint up as if it were going to be inspected by the health department. I fussed over what to wear. What does one wear for a chocolate interview? I had no idea, settling on an outfit that was nice but decidedly casual.


And so it commences . . .

They arrived on time. Three women and one man. The first woman was very young and spoke barely a word the entire time; I surmised she must have been a marketing intern who was strictly present to observe. Next was an energetic thirty-something gal who directed the activity--clearly the ring leader. She was followed in by a tall brunette with a kind face, who looked to be about my age; and, finally,there was a plump man well into his fifties with a bushy mustache, who would smile warmly throughout the entire event  (no doubt a fellow chocolate lover, I assumed). They were laden with two or three small shopping bags bulging with packaged chocolate--bars, bite size pieces, you name it. We settled at my kitchen table, which is also my dining room table (again the joys of the 1948 bungalow), and the intern pulled out a tiny tripod upon which she attached a small video camera; she focused the lens in my direction. Wasting no time, the ring leader launched right in, peppering me with questions, the first several of which I recall answering rather self-consciously. They all peered at me as if I harbored the secrets of the universe.


What was it that I liked so much about chocolate? How did chocolate make me feel? Did I like any certain kind of chocolate more than another and if so, why? This went on for quite a while. Occasionally the man would remove some chocolate from one of the sacks, silently push a particular piece toward me, gesture for me to unwrap it, and then indicate that I should taste it. What did I think of it? Would I buy it? If not, why not--what was wrong with it? Did the packaging appeal to me? What did the packaging remind me of? Was I familiar with any print or TV commercials for that particular variety of chocolate?

I recall trying some pretty odd flavor combos, perhaps the least appealing of which was a dark chocolate filled with a syrupy banana-flavored substance. Most of the packaged chocolates they'd brought carried mainstream brand names like Hershey, Dove, and Lindt, but some of the more unique and specific candy varieties seemed new and unusual. As we chatted, it became clear at one point that the man and the tall woman were both from out of state, and I realized that they must each represent a major chocolate manufacturer, though when I asked what companies they were associated with they both declined to divulge and coyly redirected the conversation.


The interview continued. Where might I typically be sitting, standing, or reclining in my house when I nibbled a piece of chocolate? Well, I said, I might very likely be curled up on a couch in the living room with something to read, along with a fresh cup of coffee. Would I, they entreated, demonstrate this exact scenario for them? Fully in the spirit of things now, I gamely kicked off my shoes, picked up a magazine, grabbed an empty coffee mug and a piece of their chocolate, and sat in my favorite corner of the loveseat. They filmed this, of course--all of them standing at a safe distance and gazing at me almost misty-eyed, as if I were a mother cheetah in a zoo grooming her newborn cub. Then they wanted to see where I stored the chocolate in my house that I used primarily for baking, so I opened the kitchen cupboard that houses those ingredients and they all leaned in closely as if they were witnessing some sort of anthropological marvel: the middle-aged American woman's baking supplies in their natural habitat--how fascinating!


True to their word, as the interview wound down we all tromped out to their car (something large, black, and shiny) and motored to a gourmet market about a mile or so away. There, I directed them to the chocolate displays and the area of the store where pricey handmade chocolate candies were sold by weight from a glass case. I remember expressing the opinion that I thought Godiva chocolates were beautifully packaged but were not nearly as good as  they used to be. At that confession the plump male out-of-towner nodded vigorously in an expression of emphatic agreement; I felt we bonded in that moment. I showed them the heavy Callebaut chocolate blocks I occasionally purchased from the store to use for baking--rough, hefty, untempered shards that were cut from a huge block. They browsed around for a while with studied interest and bought an eclectic selection of several high-end chocolate bars before we all left the store.

Back at my house they asked me to sign a couple of forms, handed me a check to reimburse me for my time, and  thanked me warmly for my cooperation.

Then they gave me the entire bag of chocolate they'd just purchased.

All in all, it was an afternoon very well spent, and almost like something from a dream.


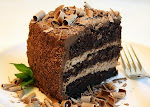
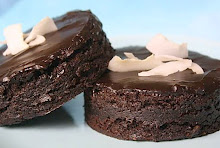
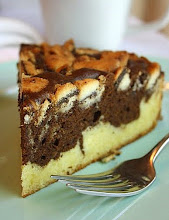
Perfectly Velvety Dark Chocolate Brownies . . .
with Milk Chocolate Chips
*This is an original recipe of Jane's, not adapted from any other published source.
(For a printable version of this recipe, click here!)

Line an 8"x8" or a 9"x9" pan with parchment. Preheat your oven to 350 degrees.

2 cups unbleached all-purpose flour
1 scant teaspoon coarse kosher salt
1/2 teaspoon baking powder
1/2 cup of unsalted butter, melted
3 oz. good quality dark chocolate, melted

2/3 cup natural cocoa powder
3/4 cup granulated sugar
2 large eggs, room temperature, lightly beaten to break them up
1 and 1/4 teaspoon vanilla extract
3/4 cup (liquid measure) half & half, room temperature
2/3 cup good quality milk chocolate chips (optional; if you prefer less sweet brownies, leave them out, but keep in mind that the brownie batter is not very sweet to begin with)

In a large bowl, whisk together the flour, salt, and baking powder. Set aside.

In a medium bowl, stir together the melted butter and melted chocolate.

In another bowl, whisk together the sugar and the cocoa powder; add this into the bowl of melted butter and chocolate, stirring well until completely combined. Then add in the eggs and vanilla extract, stirring these in completely. Now add in all of the half & half, stirring until it's all well mixed in. Scrape the bowl with a rubber spatula as needed.

Add all of the wet chocolate mixture into the large bowl of flour and stir just until it's all mixed together and no longer. Pour the chocolate chips into the batter and gently mix them in using the rubber spatula, just enough to distribute them throughout.

Pour all of the batter into your parchment-lined pan, spreading it out evenly. Bake on the middle rack of your oven for about 20 minutes, until the brownies feel somewhat firm on top, and a toothpick inserted in the center emerges looking mostly clean. Let them cool in the pan, on a rack, for about 5 minutes before removing them to finish cooling on a rack.


(If you'd like to comment on this post, or to read any existing posts, please click the purple COMMENTS below.)
  

Thursday, May 24, 2012

Rose of Persia Cake . . . with Cherry and Rose Water Glaze


I don't know . . . maybe it was the sumptuous and exotic name that first hooked me. After all, I do love roses. And the very word, Persia, sounds kind of sumptuous, don't you think?


Luscious and rich, it's a soft mink coat of a word. (And do you know what trying on a mink coat feels like? It feels like every nice, handsome man you've ever met is gently putting his arm around you.) Say it slowly . . . Perrrsssiaa. See what I mean?


Well, anyway, it took me a while to get around to finally making this unusual cake. Moist and deeply flavorful, the warm cake is finished off with a sweet, tangy glaze that's still hot when you drizzle it on. When I first stumbled upon this recipe a couple of months ago, in a bean cookbook of all things, I mentally filed it away as an item that I knew I'd absolutely have to try. So, over a period of a few weeks, I haphazardly foraged local markets, prowling for the less common ingredients.


Speaking of which, what's the least common ingredient in the cake? That would have to be the chick pea flour. Initially I didn't know where I'd find it, but a couple of Middle Eastern grocery stores later, a chunky little package of chick-pea/garbanzo-bean flour was nestled in my shopping cart. It is, after all, the key ingredient in falafel, a fact that I'd completely forgotten. And, given that metro Detroit is home to a significant population of Middle Eastern families (thus metro Detroiters are the happy patrons of many small Middle Eastern restaurants), one can be sure that a lot of falafel is being fried up around here on a daily--if not hourly--basis.


So, anyway, having assembled all of the critical components--dried cherries, unsweetened cherry juice, rose water, pistachios, and chick pea flour--the planets aligned, as I knew they would, and today became the perfect day for Rose of Persia Cake.


About this recipe . . .

From Crescent Dragonwagon's award winning book, Bean by Bean, I stuck pretty closely to her original formula. That said, I did use less lemon zest in the cake than it called for, slightly more salt, and I modified the glaze recipe to tone down the citrus aspect a bit (it called for half a cup of lemon juice . . . that's a lot) and emphasize the cherry juice and rose water. And, I rewrote the instructions to reflect exactly what I did (I rearranged some of the less critical steps), but the recipe concept is still entirely Ms. Dragonwagon's, and I must give her props for coming up with such a truly unique and tasty cake.


And fair warning: You will be entranced by the scent of this cake baking, just as Crescent predicts in her book. The aroma is a curious and delicate mixture of fruity sweetness and something akin to freshly mown grass. Sounds weird, I know, but it was actually a really good smell. I kept sniffing the air, trying to put my finger on what the scent reminded me of. I am still pondering . . .


Rose of Persia Cake
with Cherry and Rose Water Glaze
(For a printable version of this recipe, click here!)

You'll need either a 10-inch tube pan, or a 12-cup bundt pan, or several small loaf pans. (I made mine in a 10-inch non-stick tube pan.)

Ingredients for the cake:

1/2 cup dried cherries (Crescent Dragonwagon recomments using dried Bing cherries, but I used dried tart Michigan cherries and they were delicious.)
1/2 cup sour cherry juice, not sweetened
vegetable oil cooking spray (Pam)
1 and 1/2 cups sifted all-purpose flour (measure it out after sifting),
       unbleached, plus two extra tablespoons of flour for the pan
1 and 2/3 cups granulated sugar, plus two extra tablespoons of
       sugar for the pan
1 cup unsalted butter, at room temperature
3 large eggs, at room temperature
1 and 1/2 cups sifted chick pea flour (measure it out after sifting)
1/2 teaspoon baking soda
3/4 teaspoon coarse kosher salt
3/4 cup buttermilk or 1/2 cup plain yogurt thinned with water or milk (I actually used 1/2 cup buttermilk mixed with 1/4 plain yogurt because I didn't have enough buttermilk.)
2 tablespoons of rose water (Along with the chick pea flour, you can expect to find rose water in Middle Eastern markets, and in the imported foods section of major grocery stores.)
1 tablespoon of lemon zest, finely grated

Ingredients for the glaze:
2 teaspoons of rose water
2 tablespoons of fresh squeezed lemon juice
1/4 cup unsweetened cherry juice (leftover from soaked cherries in cake recipe)
2 tablespoons of water
1/2 cup granulated sugar

To sprinkle over the glazed cake:
1/4 cup chopped pistachio nuts

To make the cake:
Several hours prior to assembling the cake, soak the dried cherries in the 1/2 cup of sour cherry juice to  plump them up.

When ready to make the cake, preheat your oven to 325 degrees.

Spray your pan liberally with the vegetable oil spray. In a little bowl, whisk together the 2 tablespoons flour and the 2 tablespoons of sugar. (You may find you need even more of this mixture to fully prep your pan. I figure, better to over prep than under prep! The original recipe only called for 1 tablespoon of each. For me, that wasn't nearly enough.) Coat the inside of your pan evenly and thoroughly by shaking the flour/sugar all around. Tap out the excess. (If you're using a two-part tube pan, be sure to hold that inner part in there when doing this. It's kind of a messy procedure, so do it over your sink.)

In a large bowl, whisk together the two sifted flours, along with the baking soda and salt. Set aside.

Drain all the juice off of the soaked cherries and reserve it; don't toss it out! Place the cherries themselves in another bowl.

In the large bowl of your mixer, using the paddle attachment, cream the butter on high speed until it looks light in color and very fluffy. Continuing on high speed, pour the sugar in slowly. Keep mixing for a few minutes, until the whole thing is really nice and fluffy. One at a time, on medium speed, add in the eggs, mixing each one in until well combined, about a minute or so.

In yet another medium size bowl (I know, lots of dirty dishes), stir together the buttermilk (or buttermilk & yogurt, or yogurt & water, etc.--whatever you end up using), the rose water, and 1/4 cup of the reserved cherry juice.

On the lowest speed of your mixer, add the flour mixture into the butter mixture, alternating with the buttermilk mixture (three equal portions of flour and two equal portions of buttermilk). Beat only long enough to combine after each addition. Stop and scrape the bowl and beaters as needed. Use care not to overbeat the batter. Take the bowl off of the mixer, and gently stir in the lemon zest and drained cherries.

Spoon the batter into the prepared pan, trying to avoid leaving big air gaps. Smooth the top so it's even. Firmly but gently tap the filled pan on your work surface once or twice to help remove big air bubbles.

On the middle rack of your oven, bake the cake for about an hour and ten minutes (less time if you're using smaller pans, or a bundt pan). The cake is done when a toothpick inserted comes out clean, the top is deeply golden brown, and the cake feels kind of firm to the touch if you lightly press on it with your finger. Let the cake cool on a rack for about ten minutes, then remove it from the pan and put it right on  the serving plate you'll be using.

As it is cooling, make the glaze. Place all the glaze ingredients in a small saucepan and heat it on the stove until it just boils, then turn the heat down and let it simmer for about four or five minutes, just until it becomes slightly thicker. Stir it frequently and don't walk away; it's very easy to burn hot sugar. When the glaze looks ready, pour about one third of it over the warm cake. Then, poke several holes in the top of the cake with a toothpick, and drizzle the remainder of the glaze over the cake (I aimed for the holes).

If you like, chop 1/4 cup of pistachios and sprinkle them over the cake right after it has been glazed. Keep the cooled cake covered. The cake is so moist, it should be fine for several days.


(If you'd like to comment on this post, or to read existing comments, please click on the purple COMMENTS below.)

Saturday, May 19, 2012

Semolina & Olive Oil Sandwich Bread . . . (with Sesame Seeds, or Not!)


I never get tired of the little burst of baking euphoria that goes along with pulling a smooth, golden, fully risen loaf of bread from the oven, especially when I've just tried out a  new recipe for the first time. I just want to grab somebody and hug them whenever this happens. And I feel it even more so if I've fiddled with the bread recipe to suit my whim (always a risky practice, especially with a yeast recipe, but one that I am irresistibly drawn to repeat).

About this recipe . . .

I adapted this from a recipe I found on The Fresh Loaf --a remarkably helpful blog geared toward home bakers and focused almost entirely on bread. If the minutia of bread baking is what you're into, then you really need to check out The Fresh Loaf. It's a reliable repository of practical answers to every conceivable bread question I think I've ever had, and the community of bakers who contribute comments to this site are always kind and supportive. But I digress . . . back to the recipe.

Credited to artisan baker, author, and founder of Bread Alone Bakery, Daniel Leader, the original recipe required semolina flour exclusively, much more than I had on hand in fact. So, I made my own adjustments in that department, instead using a combo of semolina, bread flour, and unbleached all-purpose flour. I wasn't altogether sure this would work well since semolina is a very high gluten flour and I didn't have a lot of it. I was prepared for trouble, what with my changes, but by the end of the first rise, I felt confident everything would turn out fine. And it did. I also tweaked the mixing method a smidgen, doing what seemed to me to be required as I went along.


The olive oil adds a subtle aroma that's uniquely appealing, and it also obviously lends something special to the bread's beautifully textured crumb. As for the sesame seeds, I made the decision to add them on my own, but as you can see most or all of them fell off when I turned the loaves over to remove them from the pans. That was entirely my own fault: I should have wet the tops of the unbaked loaves with water, or brushed them with an egg wash, and then gently patted down the seeds to help them adhere. But I made the error of oiling the top of the loaves and simply scattering the seeds over that, and clearly, my method didn't work. Live and learn! The bread was just as good, though, despite those wayward sesames.


Made using the straight dough method (the easiest bread mixing method out there, hands down, where all the ingredients are basically assembled right at the start), I had two gorgeous loaves coming out of my oven in less than four hours, from start to finish. When I sliced a loaf of this bread open (it slices like a dream, by the way), I was greeted with the warmest, palest shade of butter yellow.


Eminently suitable for sandwiches or toast, this one is a keeper that I'm sure I'll make again.


Semolina Olive Oil Bread, with Sesame Seeds (or Not!)

(For a printable version of this recipe, click here!)

Yield: Two standard size loaves

Generously grease two bread pans with vegetable shortening.

3 cups (liquid measure) of room temperature water (about 70-75 degrees)
2 teaspoons of instant yeast (If you need to use active dry yeast instead, use 25 percent more than the indicated measurement for instant yeast. Use a little bit of the warm water to proof the active dry yeast before using it in the recipe. Instant yeast does not require proofing--that's one of its best benefits!)
2 and 3/4 cups of semolina flour
2 and 1/2 cups of bread flour
3 and 1/2 cups of unbleached all-purpose flour
2 tablespoons of granulated sugar
1 tablespoon of sea salt or coarse kosher salt
1/2 cup (liquid measure) extra-virgin olive oil

Into a large bowl, measure all of the dry ingredients and lightly whisk them together.

Into the large bowl of your mixer, fitted with paddle attachment, pour all of the water and oil. On the lowest speed, add in the dry ingredients about a cup at a time and mix until a loose dough forms.


Remove the paddle, scraping it off, and switch to the dough hook; knead the dough on the lowest speed for about five minutes. Conservatively add more flour as needed if the dough is really soft and loose, but keep in mind that if you add too much, it can negatively affect the texture of the baked loaves.


Dust your work surface generously with all-purpose flour, and dump the dough out onto it.


Flour your hands. Knead the dough by hand until it's smooth and elastic, perhaps five more minutes or so.


Place the dough into a large bowl, lightly oiled with olive oil or sprayed with vegetable spray. Turn the dough over in the bowl so it's oiled all over. Cover the bowl with oiled/sprayed plastic wrap, and cover that with a thin dish towel. Let the dough rise at warm room temperature until it doubles. Expect this to take at least 90 minutes or so.


Dump the risen dough out onto a lightly floured work surface. (Try to use as little flour on your work surface as you can get away with at this point.) Deflate the dough by pressing on it with your closed fists or the palms of your hands. Divide the dough equally into two parts using a bench knife, a bowl scraper, or a very sharp knife. Pick up one piece of dough and round it gently by tugging downward; you are trying to create surface tension. Do this to the other piece as well.


Cover each ball of dough with the oiled plastic wrap and let the dough rest for about 12 minutes. Pick up one of the balls and shape it into a loaf. Be sure to tightly seal any bottom seams by pinching them closed with your fingertips. Place the shaped dough into one of the pans. Repeat with the other ball of dough. Cover the filled pans with the oiled plastic wrap. Turn on the oven to 375 degrees.


Let the dough rise at room temperature until it crowns above the rim of the pan about 1 inch at its highest point. This will probably take an hour or more. When the dough has risen, remove the plastic wrap.


If you're not using sesame seeds, simply brush olive oil on the top of the loaves, and then they'll be ready for the oven. If you'd like to add sesame seeds, brush the top of the loaves lightly with water (or just wet your hands and very gently pat the loaves to wet them), and sprinkle the seeds on top. Gently press the seeds into the dough, being very careful not to deflate the loaves. You can lightly spritz olive oil over that, if you like.


Before inserting your pans into the oven, quickly open the oven door a little bit and, using a mister, spritz some water into the middle of the oven (don't aim for the little oven light!). Bread likes a slightly steamy atmosphere when it first starts to bake.The humidity helps to prevent the loaves from bursting haphazardly when hit with that first big rush of heat.

Bake the loaves on the middle shelf of the oven. Check them after about 20 minutes. If they seem to be browning too quickly, lightly cover them with foil. Continue baking for another 15 to 20 minutes, until the crust is deeply golden all over. If you're not sure they're done, you can check them by inserting an instant-read thermometer into the center; the internal temperature for a fully baked loaf is typically about 190 to 200 degrees.

Cool the baked loaves on cooling racks, out of their pans, for about an hour before you try slicing them.


(If you'd like to comment on this post, or to read any existing comments, please click on the purple COMMENTS below!)

Friday, May 11, 2012

Banana Brown-Sugar Muffins with Crunchy Oat Streusel . . . Definitely Brunch Worthy!


If there's any particular sort of baked good that can reliably remind me of my mom (speaking of Mother's Day), it would have to be anything featuring bananas. Her name was Stella, and she just loved them. The woman must have baked something banana-themed about once a week. Based on the profusion of banana-laced items that flew out of her oven, she could have been the PR gal for Chiquita. I wish I had a dime for every time I caught her humming the Chiquita banana ditty in her kitchen (click that link and you'll see--it's guaranteed to cheer you up if you're feeling cranky).


One of her specialities was a tall banana chiffon cake, baked in a tube pan. She'd cut two even slices, each piece about half an inch thick, and sandwich homemade vanilla buttercream between them. Served up this way, you could hold one of the 'nana-wiches in your hand and neatly munch on it with no need for a fork. It was the ultimate portable dessert. My dad eyes would light up at the sight of them, piled on a cake plate.


It's no surprise that, whenever I find myself in my own little kitchen, vigorously mashing peeled bananas, I'm reminded of her. So in case she's up there listening (and I like to think she's very often listening), I just wanted to say happy Mother's Day, Stella! I love you, will always miss you, and am so grateful you passed on your love of baking to me. And, of course, your love of bananas.


About this recipe . . .
This is my latest simple muffin experiment. I used a combo of white whole wheat flour (which is so much more palatable for a lot of folks, in baked goods like this, than regular whole wheat; whenever I use it, I don't think my family can even tell it's in there) and all-purpose; brown sugar instead of white sugar; canola oil for the fat, instead of shortening or butter; and, I added a crunchy oat streusel to the top. It's a nice muffin--not too cakey, nor too sweet, and bearing no resemblance to a doughnut--that would be quite at home nestled in a napkin-lined basket on a Mother's Day brunch table.


Banana Brown Sugar Muffins with Oat-Streusel Topping
(For a printable version of this recipe, click here!)

Preheat oven to 400 degrees. Line 12 muffins cups with paper liners or use baking spray. (Note: I've taken to doubling the paper liners whenever I make muffins or cupcakes lately. It really seems to help insulate the bottoms from over-browning, a problem that too often plagues me!) 

Ingredients for the streusel:
1/2 cup of cold unsalted butter, cut into chunks
1/3 cup of quick or old-fashioned oats
1/4 all-purpose flour, unbleached
1/4 cup granulated sugar
1/4 cup light brown sugar, lightly packed
1 small pinch coarse kosher salt

Ingredients for the muffins:
2 and 1/4 cups all-purpose flour, unbleached
1 and 1/2 cups white whole wheat flour
1 teaspoon baking powder
1/2 teaspoon baking soda
1 teaspoon coarse kosher salt

2 eggs, large
3/4 cup canola oil (or use melted, unsalted butter if you prefer--slightly cooled)
1 cup light brown sugar, packed
1 teaspoon vanilla extract
1/4 cup half & half (or milk)

4 small, very ripe, bananas (or 3 medium size, or 2 large), well mashed

Make the streusel first:

In a medium bowl, whisk together all of the dry streusel ingredients. Using a pastry blender, a fork, or your fingers, cut/press in the butter chunks until the streusel looks evenly lumpy. (The lumps should be no bigger than about the size of blueberries, but you don't need to make them terribly small.) Refrigerate the streusel until you're ready to put it on the unbaked muffins.

To make the muffin batter:

In a large bowl, whisk together all of the dry ingredients.

In a medium bowl, thoroughly whisk together the eggs, oil (or melted butter), brown sugar, vanilla extract, and half & half (or milk). Add the mashed bananas and mix in.

Make a well in the large bowl of dry ingredients, and pour in all of the wet ingredients. Using a rubber spatula or large spoon, stir just until combined, scraping the bowl regularly. There should be lots of lumps (over-mixing the batter will cause tough muffins, so don't get carried away).

Divide the batter evenly into the muffins cups using a portion scoop. Heap the batter up on each one. Sprinkle a generous spoonful of cold streusel on top of each muffin, very gently patting it in as needed to help it adhere.

Bake the muffins on the middle rack of your preheated 400 degree oven for about 10-15 minutes; check them with a toothpick inserted into the center. If it comes out clean, and the muffins are lightly golden on top, they're done. Remove them quickly from the pan, and let them cool on a rack, or serve them warm.


(If you'd like to comment on this post, or to read any existing comments, please click on the purple COMMENTS below!)

Saturday, May 5, 2012

Black Chocolate Stout Whoopie Pies . . . with Fluffy Stout Cream Filling


I suppose I should begin by telling you that beer, per se, is really not my thing. I never drink the stuff, rarely engage in beer-lingo-laden conversations about it, and have never--not even once--craved a cold glass of it. But I acknowledge that there's beer and then there's beer, and a fine quality black chocolate stout, I must concede, falls easily into the latter category. At the very least, I am willing to use it as a baking ingredient. While I have no desire to consume the stuff on its own, I realize it's the idea of the stout mingling with pure chocolate in a mixing bowl that excites my bakerly interest. It does smell kind of interesting, and looks kind of wonderful . . . it's oh-so foamy. Yes, I'll put it into cake. Just don't expect me to guzzle it.


My husband, who was once deeply enamored of home-brewing (as evidenced by the fact that I know exactly what a carboy is, and could point you to an old one in our basement), tells me that, in many cases, chocolate stouts don't actually contain any chocolate at all. They get their dark hue and intriguingly bitter flavor from special malts that lend a cocoa-like aspect. I had no idea and felt slightly cheated at that piece of news, so I was relieved to realize that I'd selected a stout for these whoopies--albeit somewhat randomly, from a store display of colorful and chunky bottles--that does indeed claim to contain true chocolate.


I chose Dubious Black Chocolate Stout from North Peak Brewing Company. (North Peak is a young craft brewery and restaurant in Traverse City, Michigan, that's housed in what was once a candy factory. Check it out if you're ever in that neck of the woods.) It clearly had pleasing qualities, obvious even to a non-beer lover like me.


Okay, I'm convinced . . .

If these tasty cream-filled whoopie pies are any indication at all, then chocolate stout and chocolate-chocolate can consort in my mixing bowl any time they want. Try it and you'll see what I mean. Just look what happens, below, when you whisk the two together. Some kind of wild and primitive chemistry ensues. I think maybe it's black magic.


About this recipe . . . 

I adapted these whoopie-pies from Baked Explorations: Classic American Desserts Reinvented, by Matt Lewis & Renato Poliafito (such a lovable cookbook, no question). I altered their basic chocolate whoopie pie formula by using a whole cup of stout for the main liquid instead of half a cup of hot coffee (I know--aren't I daring?). I omitted the espresso powder altogether, and I increased the amount of flour by about 20 percent while ratcheting up the salt just a smidgen. Somehow, these shenanigans all worked out splendidly and the cookie/cakey parts were perfectly suited to their task.

For the filling, I whipped together confectioners sugar, a splash of the stout, a little vanilla-bean paste, unsalted butter, cream cheese, and a dab of heavy cream. Too, too yummy, I tell you what. You have to try these.


Black Chocolate Stout Whoopie Pies 
with Fluffy Stout Cream Filling
(For a printable version of this recipe, click here!)

Yield: At least a dozen large whoopie pies.

Preheat your oven to 350 degrees and line two or more cookie sheets with parchment paper.

Ingredients for the cookie-cakes:
4 and 1/4 cups all-purpose flour, unbleached
scant 1/2 tsp. coarse kosher salt
1 and 1/4 tsp. baking powder
1 and 1/4 tsp. baking soda
3/4 cup natural cocoa powder (I used Penzey's brand.)
1 cup black chocolate stout, not cold (I used Dubious Black Chocolate Stout from North Peak Brewery.)
2 cups light brown sugar, firmly packed
3/4 cup canola oil
1 egg, large
1 tsp. vanilla bean paste or vanilla extract (I used Nielsen & Massey vanilla paste.)
1/2 cup buttermilk

Ingredients for the fluffy stout cream filling:
3 and 1/2 cups confectioners' sugar, sifted or whisked (I recommend Domino's 10x; if you use this, you can get away without sifting.)
2 Tbsp. black chocolate stout
1 tsp. vanilla bean paste or vanilla extract
1/2 cup unsaltened butter, room temperature
1/2 cup cream cheese, room temperature
1 and 1/2 Tbsp. heavy cream

To prepare the whoopies:

Whisk the flour, salt, baking power, and baking soda in a medium size bowl, then set aside.

In a large bowl, whisk the cocoa powder to break up lumps. Pour in the black chocolate stout and whisk until it's well mixed.

In another medium size bowl, stir together the brown sugar and the oil. Pour this into the large bowl with the chocolate mixture. Add into that the egg, vanilla, and buttermilk. Whisk until very well combined. Carefully fold in the flour, using a rubber spatula, scraping the bowl as needed.

Then, I recommend letting the batter sit for about ten minutes. It sort of thickens a bit as the dry ingredients absorb the moisture and it becomes easier to scoop.

Use an ice cream scoop to portion the batter onto the parchment sheets, leaving at least an inch for each whoopie to spread out when it bakes. (I used a number 24 scoop; that holds 3 tablespoons. Feel free to make them smaller if you like, reducing baking time accordingly.)

Bake each tray for about 12 minutes, just until the whoopies look completely dry on top and a toothpick inserted in the middle comes out mostly clean. Cool the whoopies on the parchment for a few minutes, then use a thin metal spatula to remove them to a cooling rack. They may stick a bit, even on the parchment, so be careful when you're lifting them off of it.

Once they're completely cool, assemble your whoopie pies either by spreading the filling on with an offset spatula or by using a pastry bag. Store the filled whoopies well covered (I put them on a half sheet tray that was first covered with parchment, then laid a loose sheet of parchment atop that, then covered it all with plastic wrap.) You may want to keep them chilled until ready to serve, as the filling can become quite soft.

To prepare the fluffy stout cream filling:

In the large bowl of your mixer, using the paddle attachment, beat the butter and cream cheese until soft and well combined. On the lowest speed, add in the confectioners' sugar, a cup or so at a time until the sugar is all mixed in. Add in the stout, vanilla bean paste or extract, and heavy cream. Beat on medium-high speed for a couple of minutes, until light and fluffy. If the filling seems too warm and soft, chill it before filling the whoopies.


(If you'd like to comment on this post, or to read any existing comments, please click on the purple COMMENTS below.)

Friday, May 4, 2012

Blog2Print Gift Certificate Giveaway Winner!

Just wanted to announce the winner of our Blog2Print $35 gift certificate. Drum roll please . . . Congratulations to Brooke at Tale of Three Forks blog! Brooke is a new mom who obviously loves everything about life with her baby girl. Brooke, please email me at janessweets@gmail.com, and I'll give you the info you need to retrieve your gift certificate directly from Blog2Print. Again, heartiest congratulations. I really hope you enjoy making your very own blog book.