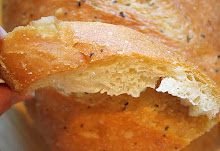
So, I have this sourdough starter that began its productive life almost three years ago, when I took what turned out to be, for me, an incredibly valuable artisan breads class. The starter lives, most of the time, in our basement fridge and occasionally emerges to get a little air and enjoy a snack, as all starters like do to from time to time. It's really pungent whenever I open up its container, really sour and sharp. I've made some of the best bread of my life with that stuff, and I hope it never gives up the ghost. Why I've never done a blog post highlighting the loaves of bread I've produced with it, I can't adequately explain. I'm talking about the kind of sourdough bread that has to proof for a long, long, long time, and which is then baked on a stone in a very hot oven enhanced with steam. This sort of bread has the most glorious, indescribable crust. I guess I just don't know how to explain how to reliably reproduce that kind of bread, probably because I'm not sure I even know myself. It's a bit unpredictable, temperamental. It has a mind of its own.

Anyway, suffice it to say that some sourdough starters can help you produce bread that is excruciatingly good. They assert themselves in finished loaves in a provocative way. They love attention. They positively bask in the glow.
But, then again, there are also some perfectly respectable sourdough starters out there that are kind of shy. In a finished loaf, their flavor tends to hang back. They're mild-mannered wallflowers, yet they're reliable and tasty, and--really--what would the world of bread be without them? That's the kind of starter that appears in today's recipe. It won't knock you off your feet with it's sourness. It'll just nudge you gently. I bought the beginnings of this shy starter just before Christmas from King Arthur Flour (KAF), and have used it three or four times thus far. Its pedigree is distinguished, to say the least. According to KAF, the ancestor of the starter I purchased came into existence well over two hundred years ago. Amazing, isn't it? I couldn't resist ordering it when I read that.

History has shown that a well-cared-for starter can thrive for ages. Literally. And, much as I will always love that very-sour starter in my basement fridge (whose ancestors hailed from a bona fide San Francisco sourdough), I really wanted to try one that was old as Methuselah, just to see what it was like. So when this shy guy arrived several weeks ago, I was excited. I brought it in the house the moment the package hit my porch. It was practically weightless, packed into a small plastic jar. I opened it, sniffed it, and quickly fed it according to the accompanying directions. (KAF actually urges you to name your sourdough, as if it's a baby they've given up for adoption.) I peered at it anxiously over the next couple of days, reassured by increasingly obvious signs of life. It woke up beautifully, bubbling right on cue. Now, it's pretty much a member of the family.

About this recipe . . .
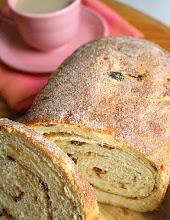
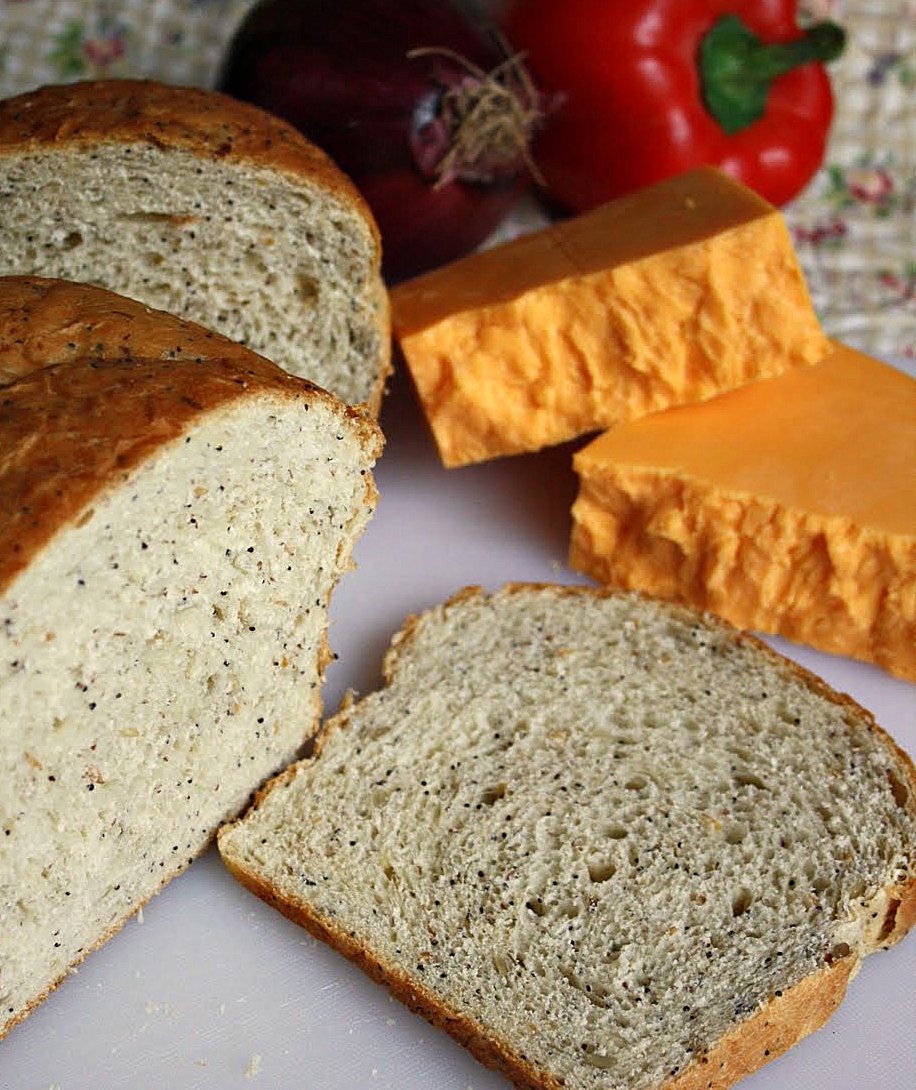
Gently adapted from this very easy formula on the KAF website, I altered the recipe by doubling it; using a simple mixture of sesame seeds, sunflower seeds, poppy seeds, and flax meal in place of their "Harvest Grains Blend" (something I have never tried, but that can be found here); and by rewording the formula to reflect exactly how I assembled it. (You can use fed or unfed starter; I used fed.) I did most of the kneading by hand, and didn't have a dough that was nearly as sticky as the original recipe warns. This is a well-textured loaf that will stay fresh and soft longer than many leaner breads. I used olive oil in it, and that flavor clearly comes through; if you aren't crazy about olive oil, be sure and use a vegetable oil instead. The sourness from the KAF starter was indeed very mild. I think maybe as my new starter matures, it'll take on more character, especially when used in long-proofing bread. It should be interesting to see how it evolves over the next few years/decades/centuries. Stay tuned!
Full Disclosure: Hey, in case you're wondering, I'm just naturally a big fan of King Arthur Flour products and recipes. I was not compensated in any way to wax rhapsodic about their stuff, nor have I ever gotten anything free from them (like, ever). I confess that I just love KAF. Heck, I wish the company was headquartered in Michigan so I could camp on their doorstep, dough-whisk in hand, an unrepentant and flour-dusted bread-groupie.
Three-Seed Sourdough Sandwich Bread
(For a printable version of this recipe, click here!)
Makes two standard-size loaves.
1 and 1/2 cup liquid sourdough starter, fed or unfed (I used fed; this recipe uses the starter more as a flavoring than as a leavener [it also includes commercial yeast for leavening], so it's okay if you use unfed. This type of liquid starter is the consistency of thick, stretchy, sticky pancake batter; it is not a solid starter. Here's a link from King Arthur Flour that will show you how to make a starter from scratch, in case you have never tried it; note that making one from scratch takes at least several days. It's worth the trouble. Once you've got your own starter up and running, the sky's the limit!)
1 and 1/3 (up to 1 and 1/2 cups) lukewarm water
2 tablespoons olive oil or vegetable oil (I used olive oil, which definitely adds a distinct flavor.)
2 tablespoons granulated sugar
2 and 1/2 teaspoons salt (I used coarse kosher salt.)
3 cups (or slightly less) unbleached all-purpose flour
1 cup plain potato flakes or 1/2 cup potato flour (I used unflavored potato flakes, the dehydrated stuff you can buy to make mashed potatoes.)
1 cup white whole wheat flour or whole wheat flour (I used white whole wheat.)
2/3 cup (total) combined mixture of sunflower seeds, poppy seeds, sesame seeds, and flax meal
4 teaspoons of instant yeast
In the large bowl of your mixer (or, if you prefer, do this by hand), combine all of the dry ingredients and gently mix them together using the paddle attachment on the lowest speed. Add in the sourdough starter, water, and oil. Mix for a couple of minutes until a nice sticky dough has started to form. At this point, if you want to stick with the mixer, switch to the dough hook and mix on low speed for about four more minutes, until the dough is smooth and elastic; if you want to knead the dough by hand, dust a clean work surface with a small handful of all-purpose flour, and knead the dough until it's smooth and elastic (this took me about seven minutes by hand).
Put the dough into a bowl that's been greased, oiled, or sprayed with vegetable spray (I did the latter). Cover the bowl with a piece of greased, oiled, etc. plastic wrap, and then cover that with a lightweight dish towel. Let the dough rise in a draft-free spot for up to about two hours, until it's doubled or almost doubled (mine was doubled at 90 minutes; that's it below, looking nice and puffy).

Lightly grease two standard-size loaf pans (I always use a pastry brush to coat bread pans with vegetable shortening). When the dough has risen sufficiently, dump it out onto a barely flour-dusted work surface (the less flour added at this point the better) and gently deflate the dough. With a bench knife or sharp chef's knife cut it into two equal pieces. Round each piece with your hands, pulling slightly downward on the tops to create surface tension. Let them rest, covered with the greased plastic wrap, for about 12 minutes.
Uncover the pieces and form them into loaves, being careful to tightly pinch closed all seams; place the pieces, seam-side down, into their pans.

Lightly cover the pans with the greased plastic wrap, and cover that with the dishtowel. Place the pans in a draft-free spot that is a little warmer than room temperature.
Preheat your oven to 350 degrees.
Let the loaves proof (have their final rise) until the dough rises at least 1" over the top of the pan. Carefully uncover the risen loaves. Mist them with water (use a squirt bottle; if you don't have one, wet your hands and very gently pat the tops of the loaves) right before you put them in the oven. Place them in the preheated oven on the middle rack, and quickly squirt your mister into the oven to create a quick burst of steam (be careful not to aim for the lightbulb).
Bake for about 20 minutes and then check to see if the bread is browning too quickly; if so, lightly tent the loaves with foil. They should be done in about 30-35 minutes (total time), when the crust is dark golden, and the internal temperature is at least 190 degrees inside. You can check by poking an instant-read thermometer into the bottom of each loaf. (I very often do this, just to be on the safe side. You'll know it's under-baked bread if the inside is kind of gummy/heavy even after it's cooled.) Take the finished loaves out of their pans and set them on a rack. Melt one or two tablespoons of unsalted butter and use a pastry brush to lightly coat the tops of the loaves while they're still warm. Let them cool almost completely before you slice them.

(If you'd like to comment on this post, or to read any existing comments, please click on the purple COMMENTS below.)